The power of precision in roof detailing
January 24, 2025 at 9:00 a.m.By Nathan Clark, Tremco Roofing.
The durability of a roofing system depends on its connections. Discover the best practices to enhance watertightness and extend the building’s lifespan.
The best application lies in the details. Whether your crew is restoring a roof membrane on a 20-year-old building or installing one on new construction, you want to ensure a watertight system that will provide lasting protection. Tremco Roofing understands the importance of roof connections and put together a guide to properly install the key types of connections. Cutting corners can lead to wasted time, added costs and unnecessary frustration for you and your customers. On the other hand, focusing on the details provides a long-lasting system and fosters trust in your relationships.
Two things to remember before detailing a roof
By taking a full system approach to detailing, rather than focusing on individual components, you are enhancing the performance and durability of your building connections. Here are two other things to keep in mind before starting your detailing:
1 – Product compatibility is critical. Be sure to check with your manufacturers prior to any applications to ensure that adjacent materials will have both adhesion and compatibility. This includes primers, solid membranes, liquid coatings, sealants and any other building materials.
2 – Detailing is all about redundancy. Water takes the path of least resistance, so system designs and applications need to make it as difficult as possible for water to get into the building. Sometimes water infiltration is obvious if it comes through the ceiling of an occupied space. Other times, it is nearly invisible if the water hides in the wall cavity. Either way, over time, water ingress could cause significant damage to the structure and potentially harm building occupants if mold develops.
Reasons for failure
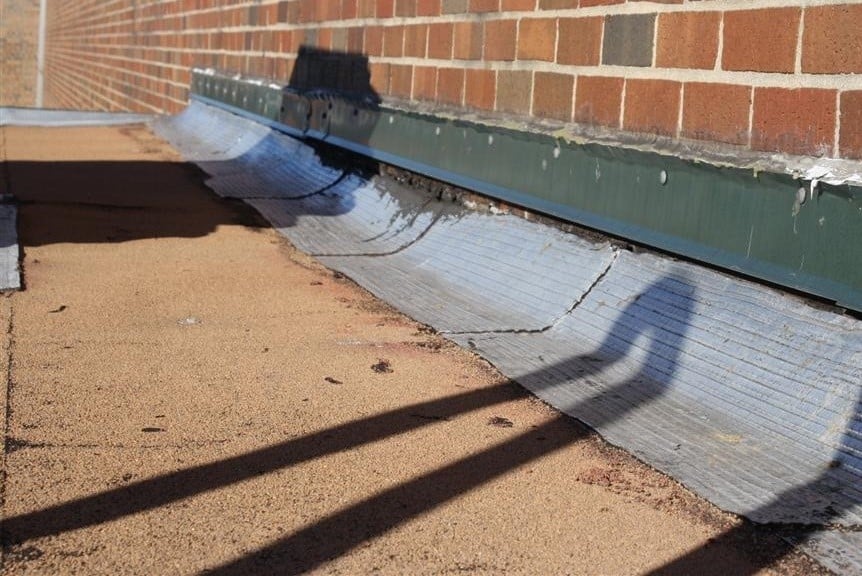 Roof connections can fail for various reasons, not all of which are under the control of the subcontractor. Poor application is the first reason that a system can fail. Membranes or fasteners could be improperly sealed, or liquid membranes could be applied at an inadequate mil thickness.
Provided that doesn’t happen, then the rest may be up to the general contractor or building/maintenance manager. Field observations are critical throughout any construction project to ensure that initial installations are done correctly and that any trades that follow do not damage that work.
Roofs may have a lot of foot traffic from HVAC trades to cable companies. Regular inspections will ensure that any issues are caught and then repaired quickly. Lastly, the roof, compared to any other section of a building, is most vulnerable to UV exposure which inevitably breaks down building materials over time. Again, ongoing review and maintenance can prevent any deteriorated products from turning into a leak concern.
Types of detailing
There are numerous conditions on the roof that require different approaches to detailing. Many of these are taken from the “Manual of Low-Slope Roof Systems”.
1 – Base flashings and counter flashings
Base flashings are the material used at the connection of the horizontal roof surface and an adjacent vertical surface such as a parapet wall, mechanical curb or expansion joint. This detail can be accomplished with a liquid product or a modified bitumen or elastomeric single ply membrane. Regardless, this material should allow for relative movement and be weather resistant.
This flashing is applied after the roof membrane and may require a backer sheet depending on the substrate. Once installed according to the manufacturer’s instructions, you will need to fasten in a toe strip-in and termination bar that is then properly sealed to shed water.
Lastly, counter flashing material should be installed over top which can be done through any of these three methods: surface mount, reglet or through-wall.

In terms of good, better, best, the surface mount is considered the good method. The metal flashing material is secured to the surface of the substrate it is protecting and sealed with a bead of sealant. The reglet method, the better, has the metal embedded into the masonry wall slightly and is detailed with grout. The best method is the through-wall flashing where the material goes entirely through the wall to act as a drain. Any water that would enter would go back to the exterior of the roof instead of into the wall cavity.
Edge flashings
Edge flashings, as their name implies, are the outside termination at the edge of the roof level. For this detail, a metal receiver should be fastened to the end of the roof-to-wall connection to receive the roof membrane and protect the exposed edge. Then a metal fascia and strip are installed for aesthetics and further protection.
Penetrations
A roof, especially on larger commercial buildings, has countless penetrations such as drains, soil stacks or pipe stacks, so sealing them properly is of utmost importance to prevent water ingress. Like the details above, penetrations can be sealed in multiple ways.
Large penetrations typically require application of a raised curb. Smaller ones may require pitch pockets which are fabricated out of metal and then filled with grout and sealers. Liquid detailing may also work in this instance. Pipes, vents and stacks are typically field wrapped with a solid membrane compatible with the surrounding roof membrane system. Overlapping patches should be shingled and edges sealed so that water cannot enter or sit at the top of the connection.
Conclusion
As you can see, even a standard roof can have a lot of complexity. Thankfully, there are numerous methods to securely detail these conditions for long-term waterproofing performance. Communication with the other trades, building owner and products manufacturer can help ensure proper application and maintenance for ongoing protection.
Original image and article source: Tremco Roofing
Learn more about Tremco in their Coffee Shop Directory or visit www.tremcoroofing.com.











Comments
Leave a Reply
Have an account? Login to leave a comment!
Sign In