The Living Roof Series: Extensive Green Roofs

By Molly Nelson, RCS Intern.
A comprehensive look at extensive green roofs including: pre-installation considerations, installation methods and post-installation maintenance.
There are multiple types of green roofs to consider as a roofing professional when working with a customer to install a living roof. The following information focuses on extensive green roofs, which are characterized by lower-lying vegetation and a growing medium of six inches or less. In Getting to Know Green Roofs, the first article of this series, we shared that these roofs are used for single-family or multi-family residential buildings and are not available for walking/recreation except for maintenance purposes. Benefits include a lower weight limit, great management for water and have the lowest price point.
Pre-installation considerations
The customer→ Location→ Timing→ Roof slope→ Structural capacity→ Cost
The customer
The target customer for extensive green roofs will be residential single-family and multi-family homes, as well as commercial buildings.
Location
When planning to construct an extensive green roof, location is a big consideration since living roofs depend on the surrounding environment and climate to be successful. Fortunately, vegetation on extensive roofs is very durable in any climate and therefore can be installed in any location. In areas that are prone to drought, an irrigation system (drip system preferred) is advised to ensure that the plants receive enough water.
In addition to geographic location, the location of the roof on the building structure is important to think about. Things to consider are the roof’s orientation to the sun for sun exposure, if there is protection from the wind, and roof height in comparison to other buildings (for shade).
Timing
The time window for extensive green roof application is much larger due to the durability of the plant species that are used for this type of roof. It is most common to install an extensive green roof during the spring and summer due to easier working conditions and because fewer steps are required to ensure that the plants can propagate and survive.
These are the steps to acknowledge if you are installing an extensive green roof in the winter: make sure the plants have adapted to the climate, use mature plants, remove any debris that can obstruct the plants from growing, and water the freshly planted plants thoroughly (can even be soaked).
Roof slope
There is no limit for which roof slope is compatible with the installation of an extensive green roof - past 45° is a green wall. However, the steeper the slope of the roof, the more need there is for a reinforcing system and soil retention systems.
The most common and easiest slope range for installation of any living roof is up to 10° or 2:12 pitch. The flatter the roof structure is, the less reinforcements for the soil medium and other materials that will be needed.
An additional consideration when evaluating roof slope for your living roof application is the orientation of the slope. If your slope is south-facing, the roof will receive more direct sunlight and this requires full-sun plants and possibly an irrigation system. North-facing slopes receive less sunlight and therefore shade-loving plants will thrive on this slope. Finally, plants on the ridgeline will receive less water than plants located on the eaves from rainfall, so choose plants accordingly.
Structural capacity
Calculating structural capacity of your building for the installation of an extensive green roof is the most important step during the pre-installation evaluation of your project. The weight-bearing capacity of the building is calculated by a structural engineer prior to installation. The typical weight of an extensive green roof, fully saturated, is 15-55 pounds per square foot, and this is the lightest dead load weight of all the living roof options.
Cost
The cost of the installation of an extensive green roof can vary depending on how much extra reinforcement, insulation and waterproofing is needed to prepare the roof deck. Without extra expenses, an extensive green roof costs an average of $10 - $12.50 per square foot. Incorporating the green roof into the design at the beginning of a new build can decrease the cost for structural evaluation.
A full breakdown of all costs for the pre-installation, installation and maintenance can be found here.
Installation methods
Waterproof membrane→ Root barrier→ Insulation layer (OPTIONAL)→ Drainage layer→ Filter mat→ Growing media→ Plants
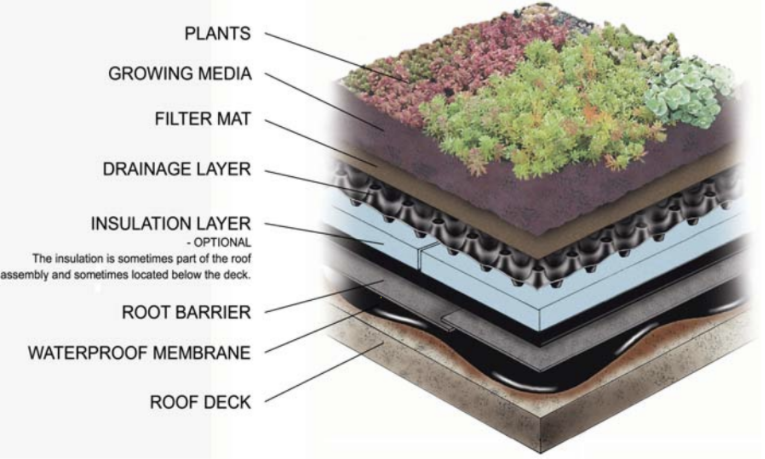
Image: American Hydrotech, Inc.
Waterproof membrane
The first layer of an extensive green roof, the waterproof membrane, is the most important feature of a green roof, as it prevents water from damaging the building and facilitates runoff. It is important that all parties involved in the installation of a living roof understand the warranty of the product being used, as well as installation restrictions.
-
Built-up/modified bitumen
-
Rubberized asphalt
-
Thermoplastic membranes/polyvinyl chloride (PVC)
-
Thermoplastic Olefin (TPO)
-
Ethylene propylene diene terpolymer/monomer (EPDM)
All single-ply membranes for the waterproof membrane of a living roof should be at least 60 mil in thickness to ensure puncture resistance from roots and increase the lifespan of the roof.
A full, comprehensive look at waterproof membrane selection, application and principles can be found here.
Root barrier
Directly above the waterproof membrane is the root barrier. This is a plastic membrane that is a physical barrier between the green roof growing media and vegetation from the waterproof membrane. This provides an additional layer of protection to ensure no water penetrates the building. If no root membrane is in place, roots can potentially grow through the waterproof membrane, which can cause leaks and structural damage. The installation of a root barrier is simple, the plastic membrane is rolled out on top of the waterproof membrane and cut to the appropriate size of the roof. If needed, the sheets of plastic can be overlapped and taped together. Now the roof is prepared for the installation of either the insulation layer or the drainage layer.
Insulation layer (OPTIONAL)
Application of the insulation layer is not required for every extensive green roof installation, especially if the insulation is part of the roof assembly or below the roof deck. However, in states that reach extreme-freezing temperatures, an insulation layer to protect the microclimate of the root system for vegetation on living roofs is advised. An insulation layer above the root barrier will be about two to three inches thick.
-
Polyurethane foam
-
Polystyrene foam
-
Fiberglass
-
Drainage layer
A drainage layer is applied with or without the insulation layer and will be applied as a network of boards/mats, pipes and drains to allow excess water to runoff the roof that could cause pooling and damage the waterproof membrane. This is where most of the post-installation maintenance will need to focus as debris build-up can cause further damage to the roof.
Sloped roofs may only need a basic gutter system due to the advantage of gravity, but flat roofs will require a more intricate drainage system design. Once any drains or other features are applied, flashing is absolutely necessary to seal the interruptions (this is where the majority of leaks are found on a living roof).
Filter mat
A filter mat is needed on top of the drainage layer if drainage mats are not used that have the capacity to prevent particulates from clogging the drainage system. A drainage mat will have a dimpled polystyrene core on the top which prevents roots from infiltrating the rest of the system while still allowing for water and air flow. If the living roof does not allow for drainage mats and requires a more complex drainage layer, then a filter mat is necessary. A filter mat is a lightweight fabric that is either a landscape fabric, polyester fiber matting or polypropylene-polyethylene matting.
Growing media
Now that all the protection layers have been installed, the growing media can be added. For an extensive green roof, the growing media will not exceed a depth of six inches. The smaller depth allows for less storm water retention; however, the overall weight of the roof will be lower. A common technique for applying the growing media is to lay all the bags containing the soil across the entire roof and cut them open one by one to ensure uniform application.
Choosing the type of substrate that comprises the growing media for any living roof will depend on the design plan for types of plants that are needed, as well as the climate of the area where the roof is being installed.
Characteristics of extensive green roof growing media:
-
Lightweight
-
High percolation rates
-
Lower nutrient levels
-
High porosity
-
Greater longevity
-
Compatible with drought-tolerant plants
-
High in mineral aggregates
-
Low in organic material
-
Plants
The last step of the installation process is to finally plant the greenery that will be the face of the green roof. Extensive green roofs will contain sedums, grasses, succulents and perennials for the vegetation layer. All of which are durable and long lasting if maintained correctly. For an average living roof, it takes up to three years for the plants to fully establish and mature. It is beneficial to consult with a landscape specialist for the selection of plants for the living roof.
Characteristics of extensive green roof plants:
-
Can last many years (perennial plants)
-
Lateral and adaptable root system
-
Require low amounts of nutrients
-
Low maintenance
-
Lightweight
-
Drought resistant
-
Wind resistant
-
Non-invasive
-
Low growing
-
Low dry after content (for fire safety)
Post-installation maintenance
For an extensive green roof to be successful long-term, regular maintenance is critical. For the first two years after installation, more intensive care is required while the plants are still establishing. Also, during the beginning of the living roof’s lifespan, frequent monitoring of the drainage system will help prevent leaks or other damage to the building.
Fortunately, extensive green roofs require less maintenance than other living roofs where a minimum of two maintenance visits per year are needed. Some roofs with more features like irrigation would need a weekly visit to assure the system is properly functioning.
Maintenance visits include, but are not limited to: drain inspection, weeding, watering (if necessary), pruning, fertilizing, replacement of dead plants and removal of debris build-up.















Comments
Leave a Reply
Have an account? Login to leave a comment!
Sign In