Introduction to the Roofing Gas Torch

By IKO.
Understanding the components of roofing torches and fuels is vital to safe operation.
Disclaimer: These tips are not a replacement for proper training. Please also ensure that all work is performed in accordance with any applicable laws and regulations in your area.
Gas torches are often used in commercial low slope roofing to apply modified bitumen membranes. It is important to understand a roofing torch’s components, including its regulator, to operate it safely. Further, you also need to understand propane and other liquid petroleum (LP) fuels. This article will introduce you to all of these essentials.
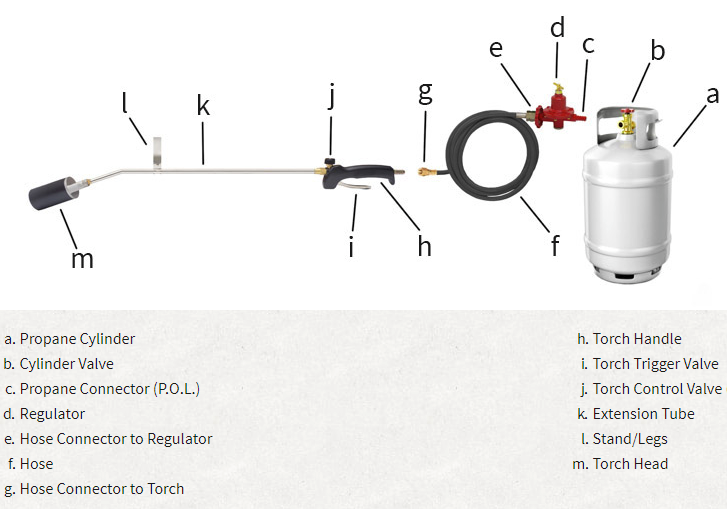
Parts of the Gas Torch and Tank
Gas torches used for roofing need to be Underwriters Laboratory (UL) approved. Approved torches may have different specifications, so always read through the manual provided by the manufacturer. However, the basics of the gas torch and tank are as follows:
- Burner head: The burner head directs the flame out so it may be pointed. Burners of different sizes will create flames of different diameters. Most roofing applications call for wide flames.
- Neck tube: Upwards of 20 inches long, the neck tube allows the roofer to use the torch while standing.
- Stand: All roofing torches must have a stand positioned near the end of the neck tube, which can be used to direct the burner head away from combustibles when the torch is placed on the ground. The flame may or may not be ignited at that time.
- Handle and lever: The roofer holds the torch by the handle and can use the lever to control the flame.
- Gas flow valve: This is the valve which allows the gas to reach the burner head. When you’re finished torching, you should always turn this valve off after the tank’s valve, to allow the gas to drain from the hose.
- Lighting system: Some torches have an automatic lighter attached to the handle. However, a flint striker is preferred. This small tool looks like an oversized bobby pin and is long enough that you can light the flame without putting your fingers in front of the burner head. Do not use a lighter.
- Flint Striker
- Hose: A hose connects the torch to the tank. It should be less than 33 feet long. There are two types of hoses: a vapor withdrawal system hose which is rated 125 psi; or, a liquid withdrawal hose which is rated to 350 psi. Do not confuse the two, as it is a significant safety risk to use a liquid withdrawal hose with a vapor withdrawal system or vice versa.
- POL connectors: The manufacturer should supply these fittings which connect the hose to the torch and tank. There are different fittings for vapor and liquid withdrawal systems. Do not use additional coupling or “quick connects” on a roofing torch’s hose, as they are prone to leaking.
The LP Cylinder consists of the parts listed below:
- LP tank: This tank, also called a cylinder, holds the LP fuel that powers the torch. Propane and butane are common fuel sources for roofing torches. The tank must always be kept in an upright position.
- Protective collar: A tough metal collar is installed on the top of an LP tank to protect it from damage. It reduces the chance that the valve or regulator is broken off, which could cause a leak or an explosion.
- Cylinder stand: A cylinder should be equipped with a stand so that you can safely and easily maneuver it. The stand should have a belt to keep the tank upright and a spot to hang the torch. Sometimes roofers will use back-mounted stands.
- Foot ring: A circular metal ring is attached to the bottom of the tank to keep it from direct contact with the ground. When lifting a 100-pound tank, one roofer must hold by the foot ring, while the other must hold from the protective collar.
- Tank valve: This valve controls the flow of gas from the tank. Never lift the tank by its valve.
- Regulator: The regulator controls the gas flow from the tank’s valve to the torch. It also acts a barrier between the torch and the high pressure of the tank. Without the regulator or with an improperly functioning regulator the gas tank and torch are serious safety hazards.
- Release valve: LP cylinders have release valves that will allow a small amount of fuel to escape if too much pressure has built up in the tank, preventing the cylinder from breaking open. Generally, this process takes a few seconds. The valve reseals afterward until the pressure builds again.
Propane Regulators for Roofing Applications
The regulator is perhaps the most essential part of the roofing torch system. It controls the PSI and the British Thermal Units (BTU) of the torch. Roofing torches generally require between 30 and 60 psi and need up to 300,000 BTU. This calls for a high-pressure regulator, which is usually painted red.
Some mistakenly believe that any red regulator can be swapped out for another, but this is not the case. Some blow torch gas regulators are installed at the tank, and others are installed in the line. Plus, there are different high-pressure regulators for liquid and vapor withdrawal systems and different regulators for one-stage or two-stage systems. You should always use a regulator supplied by your torch manufacturer.
It’s helpful for the roofing professional to understand the difference between one-stage and two-stage regulators. In a one-stage system, the regulator delivers the fuel from the tank right into the hose at the right pressure.
In contrast, two-stage regulators actually combine two different regulators. The first regulator in this system delivers your fuel from the tank into the hose but at a low pressure. The second regulator provides more pressure, which allows the torch to achieve more BTU over longer hose distances.
A roofing professional will likely use a two-stage regulator because a high amount of BTU and a long hose are both required for most roofing applications. Sometimes these two regulators can be combined into one component, which is called an integral twin regulator. However, these regulators can’t provide as much pressure as two-stage regulators.
A roofing torch requires an adjustable high-pressure regulator, as opposed to a non-adjustable regulator. This doesn’t mean that you can manually change the propane torch regulator settings. Instead, it means that the regulator will automatically adjust as you squeeze the torch’s lever, allowing for more or less pressure. You should not attempt to change the propane torch regulator settings yourself. Have a qualified professional do so.
You may find that you need one general-purpose roofing torch and another for finer detail work, which requires much less BTU. A typical detail propane torch would achieve less than 105,000 BTU, a far cry from the average maximum of full-sized torches at 300,000 BTU. Instead of trying to adjust your propane torch’s regulator settings to achieve the lower output, it’s better to have two torches, one dedicated to smaller detail work.
Most roofers will examine their torch’s performance based on how the roofing membrane reacts instead of using an exact temperature for their work. A properly heated membrane will shine. Some manufacturers place a film on the inside of the membrane, which burns off when the membrane reaches the right temperature.
Overheating the membrane will cause most roofing materials to smoke. If you are regularly bringing the membrane to its smoke point, you may need to have a professional change your propane torch regulator settings, or simply move the torch faster along the membrane. The neck tube length and burner head size can also be adjusted to vary BTU output, but only a qualified service person should make these adjustments.
The last thing you need to know about gas regulators is that they may freeze if you are roofing in cold weather. If your regulator appears to be frozen, you should not attempt to use it. Set it aside for the day and bring it to a qualified professional to see if the freeze has caused long-term damage.
Characteristics of Propane
Propane is the most common LP fuel used for roofing applications because it can achieve the necessary temperature, is relatively cheap and is readily available.
Propane and other LP fuels are compressed into the tanks and become liquids because of the pressure. When propane is released, it expands to 270 times the size it was in the tank. Though the tanks are small, they are deceptively heavy. If you are using a 100-pound tank, two roofers are required to move it.
Propane and other LP fuels are heavier than air, which means that they will collect on the ground unless the area is ventilated. When collected the propane may push away oxygen, preventing you from breathing, and increasing the risk of an explosion. To avoid workplace injuries, you need to ensure proper ventilation. The open air of the roof is enough ventilation, but storage containers may be too restrictive. This is why propane tanks should not be stored in closed areas, like truck cabs or sheds. Ideally, they should be stored outside.
You also need to take special precautions with propane when working in cold weather. In the winter propane flows more slowly, and the flame’s efficiency is reduced. Of course, the materials you are heating will be colder too, so they will take even longer to heat. You will need to plan for extra fuel if using a propane blow torch in cold temperatures.
Maintaining Your Roofing Gas Torch
You should maintain your gas torch and tank according to the manufacturer’s guidelines. However, there are some best practices, such as:
- It is best to disconnect the torch after use.
- When the torch is not attached, you should put a plastic plug on the outlet valve of your regulator. Do not attempt to take the regulator or tank valve off!
- You should not store the tank near heat sources, like furnaces and heat vents.
- You should keep the regulator vent clear of any debris.
Roofing Gas Torch and Regulator Repair
Over time, you may find that any part of your gas torch has become damaged or is no longer working properly. The regulator specifically has moving parts and is subject to wear and tear. While some parts of a torch can be repaired others (like the regulator and hose) must be replaced.
Signs your roofing torch has stopped functioning properly include:
- You feel a loss of pressure.
- You feel a loss of heat or the flame goes out.
- The flame stutters.
- There is an unusual noise, like loud hissing, roaring or popping.
- The flame turns from blue to orange or yellow.
- Flames are escaping the side of the burner head.
If your roofing gas torch seems to have problems, you should bring it to a qualified professional. This individual can tell you if the parts in question can be repaired or if they need to be replaced.
Roofing gas torches are ideal tools for many commercial low slope roofing applications. Understanding the torch’s components, especially the regulator, will help you operate the torch safely. It will also help you maintain the torch and identify when repair or replacement may be needed. Remember that safety should be your top concern when operating a roofing torch. Visit our commercial roofing section to learn more about heat welded membranes.
Learn more about IKO.
Editor’s note: This article was first published on IKO’s blog and can be viewed here.


Comments
Leave a Reply
Have an account? Login to leave a comment!
Sign In